
On Saturday and Sunday, I finally got around to installing my aftermarket amp and sub. I have a 2017 5-door Sport with the upgraded factory HK stereo, this is the "8 channel" stereo with the HK amp located underneath the passenger seat. For the most part, the upgraded stereo sounds good, but I wanted more low end and I always have a subwoofer with my home and car stereos. Before I got my Impreza I had a 2-door VW Rabbit with a 10" Alpine Type R that I was running at 500 watts at 2 ohms with an Alpine M500. I wasn't sure if I was going to run an 8" or a 10" in the Subie but I knew I didn't need 500 watts. The installation took way longer than I thought mostly because of getting through the firewall...but in the end it wasn't too bad. I am going to bullet point my process, I took far fewer pictures than I wanted and might go back to take a few more. I researched this for months, but couldn't find a lot of detailed information specifically for the 5th-generation Impreza. I found some promising material for the newer Foresters, WRXs, and Corsstreks and that for the most part helped, with the exception of the firewall. Ironically, I should have just used the pictures I found on this forum for that step. Anyways, here we go! I ended up getting the following:
- JL Audio RBC1 remote bass control
- JL Audio JX250/1 at 160 watts | 4 ohms
- JL Audio 8w1v3-4
- I made a temporary sealed MDF enclosure | .35 cubic feet
- Two "left side" heating duct extensions from Subaru
- Rockford Fosgate wiring kit
- Posi-Taps and Posi-Twists
- Split Wire Loom/Twist Ties/Electricians Tape
Steps:
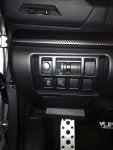
- the first thing I did was long before this past weekend...I removed part of the dash where the blind spot monitor/dashboard illumination/traction control buttons are I took out one of the blank spots and added the RBC1 remote bass control knob...this turned out pretty great!...it is in an excellent location and looks OEM+
- the first real hurdle of the install was getting through the firewall...I researched this a lot and it seemed like the "easiest" way was to go through the wheel well on the driver's side...this will not work on the Impreza the rubber grommets are basically inaccessible because there is a large piece of metal in front of them and only a small passthrough hole...I immediately put my fender liner back in (unfortunately I broke three of the fender lining clips and will replace them tomorrow with ones I got off of Amazon...they have all corroded anyways even after one year so I'm glad I bought a bag of twenty to replace them as needed)...what I ended up doing was exactly what was specified on the forum...there is a part in the center/right center of the engine bay where the factory wires go through...it looked like there were three large bundles of wires that go through a rubber gasket...I put some electrical tape on a wire coathanger and saw that it easily passed through so I taped the coathanger to the power wire...it made it about six-eight inches before it got stuck...thankfully I had a friend helping me on Saturday so he gently was moving the coathanger and I climbed in the driver's side and looked up behind the dash (this was extremely hard/awkward because I'm 6'4") but we found out that the bundle of wires comes through the firewall inside of a rubber sleeve...with the coathanger providing a little pressure I could see it pushing against the rubber sleeve...I cut a small hole with an X-Acto knife and the wire pushed right through...this whole ordeal took two and a half hours
- next step was to figure out where to put the in-line fuse on the power wire...I went back and forth but ended up using zip ties to secure the base of the in-line fuse onto a flat piece of metal, this worked out perfectly because the other spot I considered would have had the wire going over the factory fuse box and that would have been annoying to gain access to the fuse box...I wire loomed the power wire, zip tied it to a spot where other factory wires were zip tied and finally routed out a little channel on the positive terminal cover...success!
- next up we unbolted the front two seats...originally I was going to take them out, but I didn't want to mess with disconnecting the heated seat wires...it ended up that if you unbolted them you could just tip them backward and it was fine...there were four bolts for each seat...12mm socket worked perfectly
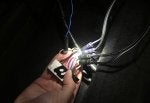
- on to the factory HK amp...this is where I was going to tap into the speaker wires and potentially the 12V wire for the remote turn on for the amp (this was an issue which I will talk about later)...I used the Posi-Taps and the Crutchfield wiring diagram. I tapped into the FRONT speakers (which sound excellent) and into a "constant" 12V wire...now I had never tapped into a wire like this for a remote turn on and I misunderstood that constant literally meant constant 12V regardless of whether the car was on or off...so in the picture you'll see four Posi-Taps close to each other and one single Posi-Tap...I have since removed the single Posi-Tap and put some electricians tape over the small hole
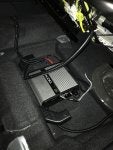
- I knew the location of the new amp was going to go under the driver's seat...I had purchased two heating duct extensions from Subaru because I didn't want hot air blowing right onto the amp...from Subaru you can only buy the "left side" ducts...I figured the piece was symmetric and sure enough I flipped it over and it fit perfectly...amazingly the duct extensions worked perfectly with the JL audio amp...there are two bolts under both the driver's and passenger seat this is where I grounded the amp
- so the car was a mess and wires are everywhere but at least we could reconnect the battery and test and tune the amp...now the issue I knew I was going to face with tuning the amp was that my speakers were still connected...I didn't want to turn my stereo to 3/4 volume and play the 50hz sound wave and have it blasting through the speakers...I also wasn't about to take apart the doors to disconnect the speakers/mess with the wiring harness at the factory HK amp because there was so little of room to work with and well I just didn't want to cut the wires for a temporary sound check/take apart anything I didn't "have" to....so I cheated at this step and yes I need to continue to work on the tune of the amp...but I turned up the factory stereo to 14 (on the HK upgrade the stereo goes to 38...I have never once turned it past 12 I almost always listen to it around 7-10) we tuned it accordingly but I knew this was/is going to change...the gain on the amp was set to between 10/11 o'clock (which is not very much at all)...at this point my friend had to go so we turned the car off and noticed the amp still had the power light on...I thought o maybe in 5-10 minutes it will turn off...it didn't and I was stumped
- after my friend left and I took a little break I called Crutchfield and they confirmed that indeed constant 12V means constant 12V regardless of whether or not the car is on or off...the draw must be so low it doesn't matter??...but I mean the approach lights, the welcome animation, interior lights...they all come on when the car isn't turned on..I ended up getting a fuse tap for the interior fuse panel...now I don't work on the electrical systems of cars that often but I found that our fuses are low profile atm mini fuses...I tried two different fuses and the amp remained on both times...I finally decided on tapping into the rear-view mirror fuse because I would immediately know if the compass/dimming/garage door button stopped working...this worked perfectly...time for bed
- Sunday was all about the wire tuck...lots of split wire looming and zip ties...I hate seeing wires and I wanted everything to be secure, safe and looking factory...the engine bay was done time to move on to the interior...I went a little crazy running the speaker wire to the sub but I took out the rear seat deck completely (this was extremely easy, there are only two claps that lock it in place)...I also removed some trim on the driver's side both in the front and in the back...I got that speaker wire ran...then I ran the speaker wires from the factory HK amp over to the new amp I used the Posi-Twists to connect the speaker wire to the high-level input wiring harness...no need for LOC the JL amp has a built-in high-level input, then I cleaned up the power wire, remote turn on wire, and added the phone line wire for the bass knob...these all got split wire loom and got tucked under the dash, the center cupholder area and ran to the new amp
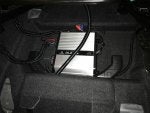
- the subwoofer is in a temporary MDF box that I made...it is the recommended cubic feet of .35 out of 3/4" thick material...I didn't try too hard to paint it (in fact it looks terrible) because I know that I will be building a fiberglass enclosure on the passenger side in the trunk (the driver's side has a light that I don't want to cover up)...but this works for now...I want to listen to the sub for a while, fine tune the amp, and make sure all of the wires stay securely/are aesthetically pleasing (ie I can't see them)...
- at this point, I was pretty much good to go...I tried to retune the amp best I could using a voltmeter/just listening to it...I know that it isn't "fully correct" but again I don't plan on disconnecting my speakers and cranking the stereo to the recommended 3/4 volume...tuned up...rebolted down the seats...and done
Semi-final conclusions are the following: man this setup sounds AMAZING for a little 8" sub pushing around 160 watts. It is plenty loud and sounds super super clean. The DSP from the HK amp obviously comes into play here and I have no control over that from what I've listened to so far zero complaints...but I love that I have my factory stereo, can't see any wires, the new amp is not in the way at all, the heat from the vents goes around the amp, and for the most part the sub isn't taking up too much space...when I build the real enclosure it will be great, and I'll have a fully functional trunk again...which for now I don't care about because we just use the wife's Forester...also the bass knob is a MUST HAVE...I can't believe I didn't run this on my last set up...overall it was time-consuming but certainly not hard once I got going...I think that's about it...if you have any questions feel free to ask!
- JL Audio RBC1 remote bass control
- JL Audio JX250/1 at 160 watts | 4 ohms
- JL Audio 8w1v3-4
- I made a temporary sealed MDF enclosure | .35 cubic feet
- Two "left side" heating duct extensions from Subaru
- Rockford Fosgate wiring kit
- Posi-Taps and Posi-Twists
- Split Wire Loom/Twist Ties/Electricians Tape
Steps:
- the first thing I did was long before this past weekend...I removed part of the dash where the blind spot monitor/dashboard illumination/traction control buttons are I took out one of the blank spots and added the RBC1 remote bass control knob...this turned out pretty great!...it is in an excellent location and looks OEM+
- the first real hurdle of the install was getting through the firewall...I researched this a lot and it seemed like the "easiest" way was to go through the wheel well on the driver's side...this will not work on the Impreza the rubber grommets are basically inaccessible because there is a large piece of metal in front of them and only a small passthrough hole...I immediately put my fender liner back in (unfortunately I broke three of the fender lining clips and will replace them tomorrow with ones I got off of Amazon...they have all corroded anyways even after one year so I'm glad I bought a bag of twenty to replace them as needed)...what I ended up doing was exactly what was specified on the forum...there is a part in the center/right center of the engine bay where the factory wires go through...it looked like there were three large bundles of wires that go through a rubber gasket...I put some electrical tape on a wire coathanger and saw that it easily passed through so I taped the coathanger to the power wire...it made it about six-eight inches before it got stuck...thankfully I had a friend helping me on Saturday so he gently was moving the coathanger and I climbed in the driver's side and looked up behind the dash (this was extremely hard/awkward because I'm 6'4") but we found out that the bundle of wires comes through the firewall inside of a rubber sleeve...with the coathanger providing a little pressure I could see it pushing against the rubber sleeve...I cut a small hole with an X-Acto knife and the wire pushed right through...this whole ordeal took two and a half hours
- next step was to figure out where to put the in-line fuse on the power wire...I went back and forth but ended up using zip ties to secure the base of the in-line fuse onto a flat piece of metal, this worked out perfectly because the other spot I considered would have had the wire going over the factory fuse box and that would have been annoying to gain access to the fuse box...I wire loomed the power wire, zip tied it to a spot where other factory wires were zip tied and finally routed out a little channel on the positive terminal cover...success!
- next up we unbolted the front two seats...originally I was going to take them out, but I didn't want to mess with disconnecting the heated seat wires...it ended up that if you unbolted them you could just tip them backward and it was fine...there were four bolts for each seat...12mm socket worked perfectly
- on to the factory HK amp...this is where I was going to tap into the speaker wires and potentially the 12V wire for the remote turn on for the amp (this was an issue which I will talk about later)...I used the Posi-Taps and the Crutchfield wiring diagram. I tapped into the FRONT speakers (which sound excellent) and into a "constant" 12V wire...now I had never tapped into a wire like this for a remote turn on and I misunderstood that constant literally meant constant 12V regardless of whether the car was on or off...so in the picture you'll see four Posi-Taps close to each other and one single Posi-Tap...I have since removed the single Posi-Tap and put some electricians tape over the small hole
- I knew the location of the new amp was going to go under the driver's seat...I had purchased two heating duct extensions from Subaru because I didn't want hot air blowing right onto the amp...from Subaru you can only buy the "left side" ducts...I figured the piece was symmetric and sure enough I flipped it over and it fit perfectly...amazingly the duct extensions worked perfectly with the JL audio amp...there are two bolts under both the driver's and passenger seat this is where I grounded the amp
- so the car was a mess and wires are everywhere but at least we could reconnect the battery and test and tune the amp...now the issue I knew I was going to face with tuning the amp was that my speakers were still connected...I didn't want to turn my stereo to 3/4 volume and play the 50hz sound wave and have it blasting through the speakers...I also wasn't about to take apart the doors to disconnect the speakers/mess with the wiring harness at the factory HK amp because there was so little of room to work with and well I just didn't want to cut the wires for a temporary sound check/take apart anything I didn't "have" to....so I cheated at this step and yes I need to continue to work on the tune of the amp...but I turned up the factory stereo to 14 (on the HK upgrade the stereo goes to 38...I have never once turned it past 12 I almost always listen to it around 7-10) we tuned it accordingly but I knew this was/is going to change...the gain on the amp was set to between 10/11 o'clock (which is not very much at all)...at this point my friend had to go so we turned the car off and noticed the amp still had the power light on...I thought o maybe in 5-10 minutes it will turn off...it didn't and I was stumped
- after my friend left and I took a little break I called Crutchfield and they confirmed that indeed constant 12V means constant 12V regardless of whether or not the car is on or off...the draw must be so low it doesn't matter??...but I mean the approach lights, the welcome animation, interior lights...they all come on when the car isn't turned on..I ended up getting a fuse tap for the interior fuse panel...now I don't work on the electrical systems of cars that often but I found that our fuses are low profile atm mini fuses...I tried two different fuses and the amp remained on both times...I finally decided on tapping into the rear-view mirror fuse because I would immediately know if the compass/dimming/garage door button stopped working...this worked perfectly...time for bed
- Sunday was all about the wire tuck...lots of split wire looming and zip ties...I hate seeing wires and I wanted everything to be secure, safe and looking factory...the engine bay was done time to move on to the interior...I went a little crazy running the speaker wire to the sub but I took out the rear seat deck completely (this was extremely easy, there are only two claps that lock it in place)...I also removed some trim on the driver's side both in the front and in the back...I got that speaker wire ran...then I ran the speaker wires from the factory HK amp over to the new amp I used the Posi-Twists to connect the speaker wire to the high-level input wiring harness...no need for LOC the JL amp has a built-in high-level input, then I cleaned up the power wire, remote turn on wire, and added the phone line wire for the bass knob...these all got split wire loom and got tucked under the dash, the center cupholder area and ran to the new amp
- the subwoofer is in a temporary MDF box that I made...it is the recommended cubic feet of .35 out of 3/4" thick material...I didn't try too hard to paint it (in fact it looks terrible) because I know that I will be building a fiberglass enclosure on the passenger side in the trunk (the driver's side has a light that I don't want to cover up)...but this works for now...I want to listen to the sub for a while, fine tune the amp, and make sure all of the wires stay securely/are aesthetically pleasing (ie I can't see them)...
- at this point, I was pretty much good to go...I tried to retune the amp best I could using a voltmeter/just listening to it...I know that it isn't "fully correct" but again I don't plan on disconnecting my speakers and cranking the stereo to the recommended 3/4 volume...tuned up...rebolted down the seats...and done
Semi-final conclusions are the following: man this setup sounds AMAZING for a little 8" sub pushing around 160 watts. It is plenty loud and sounds super super clean. The DSP from the HK amp obviously comes into play here and I have no control over that from what I've listened to so far zero complaints...but I love that I have my factory stereo, can't see any wires, the new amp is not in the way at all, the heat from the vents goes around the amp, and for the most part the sub isn't taking up too much space...when I build the real enclosure it will be great, and I'll have a fully functional trunk again...which for now I don't care about because we just use the wife's Forester...also the bass knob is a MUST HAVE...I can't believe I didn't run this on my last set up...overall it was time-consuming but certainly not hard once I got going...I think that's about it...if you have any questions feel free to ask!